How Can We Help?
Data Subtypes
Sub-Types allow you to organize data in your graphs and data summary pages more accurately. You are already able to differentiate between simple data probe types by using different symbols (⚫,▲,◾, etc.) known as the data Type. However, in some cases, it is necessary to differentiate between data types even further. For those instances, you can also assign a letter based Sub-Type (A, B, C, etc.) to your data.
As an example, you may already use the triangle Type (▲) to mark generalization probes in your data. What if you decided that in a certain program it is beneficial to probe generalization across both settings and materials? For this circumstance, you could use Sub-Types to differentiate between your settings and materials generalization probes. Simply define one subtype as ‘generalization – across settings’ (A), and another as ‘generalization – across materials’ (B). Then, when you conduct your different generalization probes you can easily differentiate between your settings probes (▲A, ▲B) using the Sub-Types that you created.
Assigning a Sub-Type
Assigning a Sub-Type is incredibly easy. While you are collecting your data, simply tap on the drop down button to the right of the Sub-Type label that sits below the Type section. A list of all of the Sub-Types that you have created will be displayed, allowing you to choose which Sub-Type you would like to assign to this data probe.
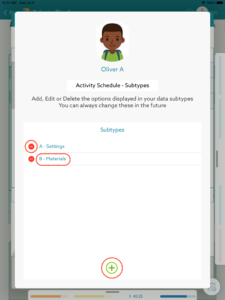
Creating/Editing/Deleting a Sub-Type
To create a new Sub-Type or edit/delete ones that you have already created simply open your Sub-Types within the data collection page. At the bottom of the drop down list, you will see the option to ‘Add/Edit Entries’. Tapping this option opens a new page where you can easily manage your Sub-Types.
- To add a new Sub-Type: Tap the Green Plus button at the bottom of the page
- To edit a Sub-Type: Tap the Sub-Type name
- To delete a Sub-Type: Tap the red minus button to the left of the Sub-Type
Where you can see Sub-Type
When you designate a Sub-Type to a probe, it will appear in the data summary page in the bottom right of the box that shows the data Type. It will also appear on the graph, just to the right of the data Type symbol.
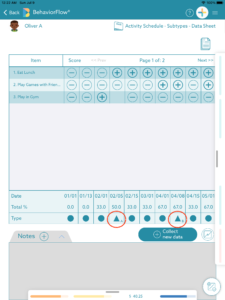
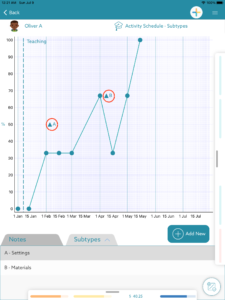
You can also see a full list of the Sub-Types that have been designated on a program in the ‘Sub-Types’ tab that exists just to the right of the ‘Notes’ tab. This can be expanded to see the full list by tapping the up caret (^).
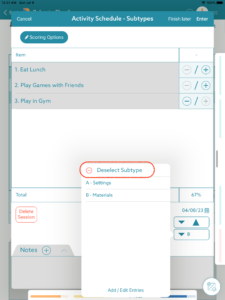
Changing the Sub-Type of a probe you have already entered
If you accidentally mark a data probe with the wrong Sub-Type you can always change it. Simply tap on the data column of pluses and minuses in the data summary page to reopen the data session. Once it opens, tap the Sub-Type button. At the top of the list you will now see the “Deselect Subtype” option to remove the Sub-Type that you designated for this data probe. Once removed, you can re-open the data column and select the Sub-Type that you meant to use.